User Guide

Welcome to TeachStack!
At TeachStack, our mission is simple: to ensure every computer science instructor is able to provide the support their students need. As enrollment in computer science courses continues to rise, the demand for effective teaching tools has never been greater. Designed specifically for Command Line Interface (CLI) users like you, TeachStack is an intuitive and customizable application that empowers instructors to actively manage their students through group-building features, archiving, and strength categorization.
Join us on this journey of educational excellence with TeachStack. With TeachStack, let’s empower instructors and elevate the standard of computer science education.
Happy teaching!
Table of contents
- TeachStack
- Table of Contents
- 1. Welcome
- 2. How to use this user guide
- 3. Target User
- 4. Purpose of User Guide (UG)
- 5. Quick Start
- 6. Understanding our graphical user interface
-
7. Features
- 7.1 Viewing Help
- 7.2 Adding a student
- 7.3 Listing all students
- 7.4 Editing a student
- 7.5 Viewing a student
- 7.6 Deleting a student
- 7.7 Forming focus groups
- 7.8 Filtering students by groups
- 7.9 Clearing all entries
- 7.10 Archiving Features
- 7.11 Exiting the program
- 7.12 Saving data
- 7.13 Editing the data file
- 7.14 Setting a weak threshold
- 7.15 Viewing summary statistics
- 8. Glossary
- 9. FAQ
- 10. Known Issues
- 11. Command Summary
1. Welcome!
Thank you for choosing to use TeachStack! Our product aims to help you allocate resources to keep track of weaker students, and is optimized to be used with the Command Line Interface (CLI).
This is achieved through the use of focus groups, which are groups consisting of students of a weaker skill level. Focus groups can then be assigned teaching resources such as consultation slots, instructors, teaching venues, and more. By teaching students of a similar skill level together (i.e. ability grouping), you can tailor your teaching to fit a specific student demographic instead of a one-size-fits-all approach, saving you time and effort. Not to mention, ability grouping is proven to improve the group’s progress as a whole. So, are you ready to help students in need?
2. How to use the user guide
This guide explains how you can use TeachStack to manage weaker students. It will walk you through each feature and functionality of the app, ensuring you’re equipped to make the most of TeachStack’s capabilities.
- To get started with TeachStack. Quick start
- To understand the GUI. Understanding our GUI
- To see details of the commands and features. Features
- To quickly navigate to a specific section. Table of contents
- To see an overview of all commands. Command summary
- If you encounter any technical term, please refer to the glossary. Glossary
- If you encounter any problem, you may find your answer in the FAQ. FAQ
2.1 Terminologies / Symbols
Extra information are given in boxes:
-
 denotes additional information
 -
 denotes warning that can cause error
The explanation of each command will be formatted in the following convention:
- What the command does
- The format of the command
- Valid values that the command can take in
- Example usages
- Optional Screenshot
3. Target user/audience
TeachStack is tailored for computer science instructors, currently only for those in NUS. This is due to our constraints on email, studentID, grading scheme format.
3.1 Assumptions
- We assume that users are passionate educators who wish to see their students succeed. This is important as TeachStack mainly allows instructors to track the performance of weaker students, so the application can only demonstrate its full potential in the hands of instructors who care.
- We also assume that users are somewhat familiar with computers and have used computer applications in the past, which will help them follow this guide and use TeachStack effectively. Since most instructors will have used similar applications (e.g. Canvas), this is a reasonable assumption to make.
4. Purpose of User Guide (UG)
The purpose of the User Guide (UG) for TeachStack is to provide users with a comprehensive understanding of the application’s features and functionalities. Structured to facilitate ease of use and enhance productivity, the guide offers clear instructions, detailed explanations, and reference materials such as command summaries and a glossary. By empowering users with the knowledge to efficiently navigate TeachStack’s Command Line Interface (CLI) and Graphical User Interface (GUI), the UG aims to streamline student management tasks and ensure optimal utilization of the application’s capabilities.
5. Quick start
-
Ensure you have Java
11or above installed in your Computer. -
Download the latest
TeachStack.jarfrom here. -
Copy the file to the folder you want to use as the home folder for your TeachStack.
-
Open a command terminal,
cdinto the folder you put the jar file in, and use thejava -jar TeachStack.jarcommand to run the application.
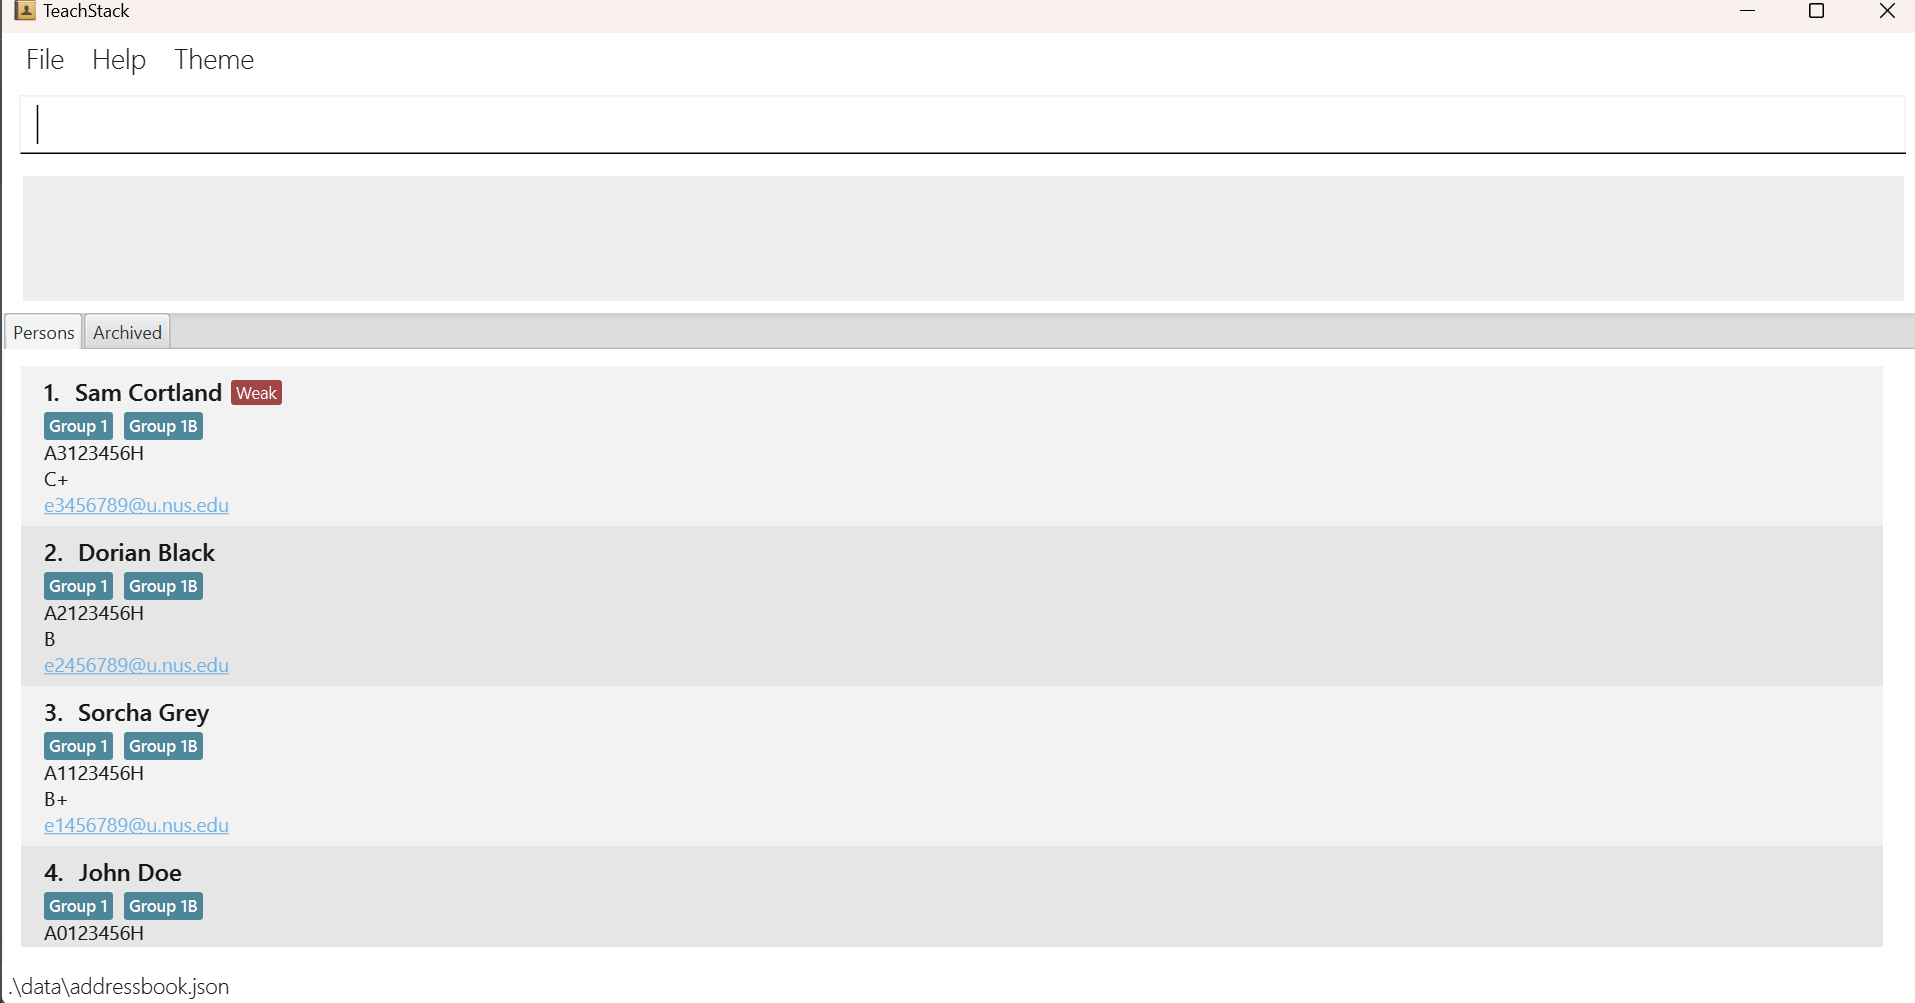
A GUI similar to the below should appear in a few seconds. Note how the app contains some sample data.
-
Type the command in the command box and press Enter to execute it. e.g. typing
helpand pressing Enter will open the help window.
Some example commands you can try:-
list: Lists all students. -
add id/A0123459H n/John Doe e/e0123456@u.nus.edu g/B: Adds a student namedJohn Doeto the list. -
delete A0123459H: Deletes the student with student id A0123459H from the list. -
clear: Deletes all students. -
exit: Exits the app.
-
-
Refer to the Features below for details of each command.
6. Understanding our GUI
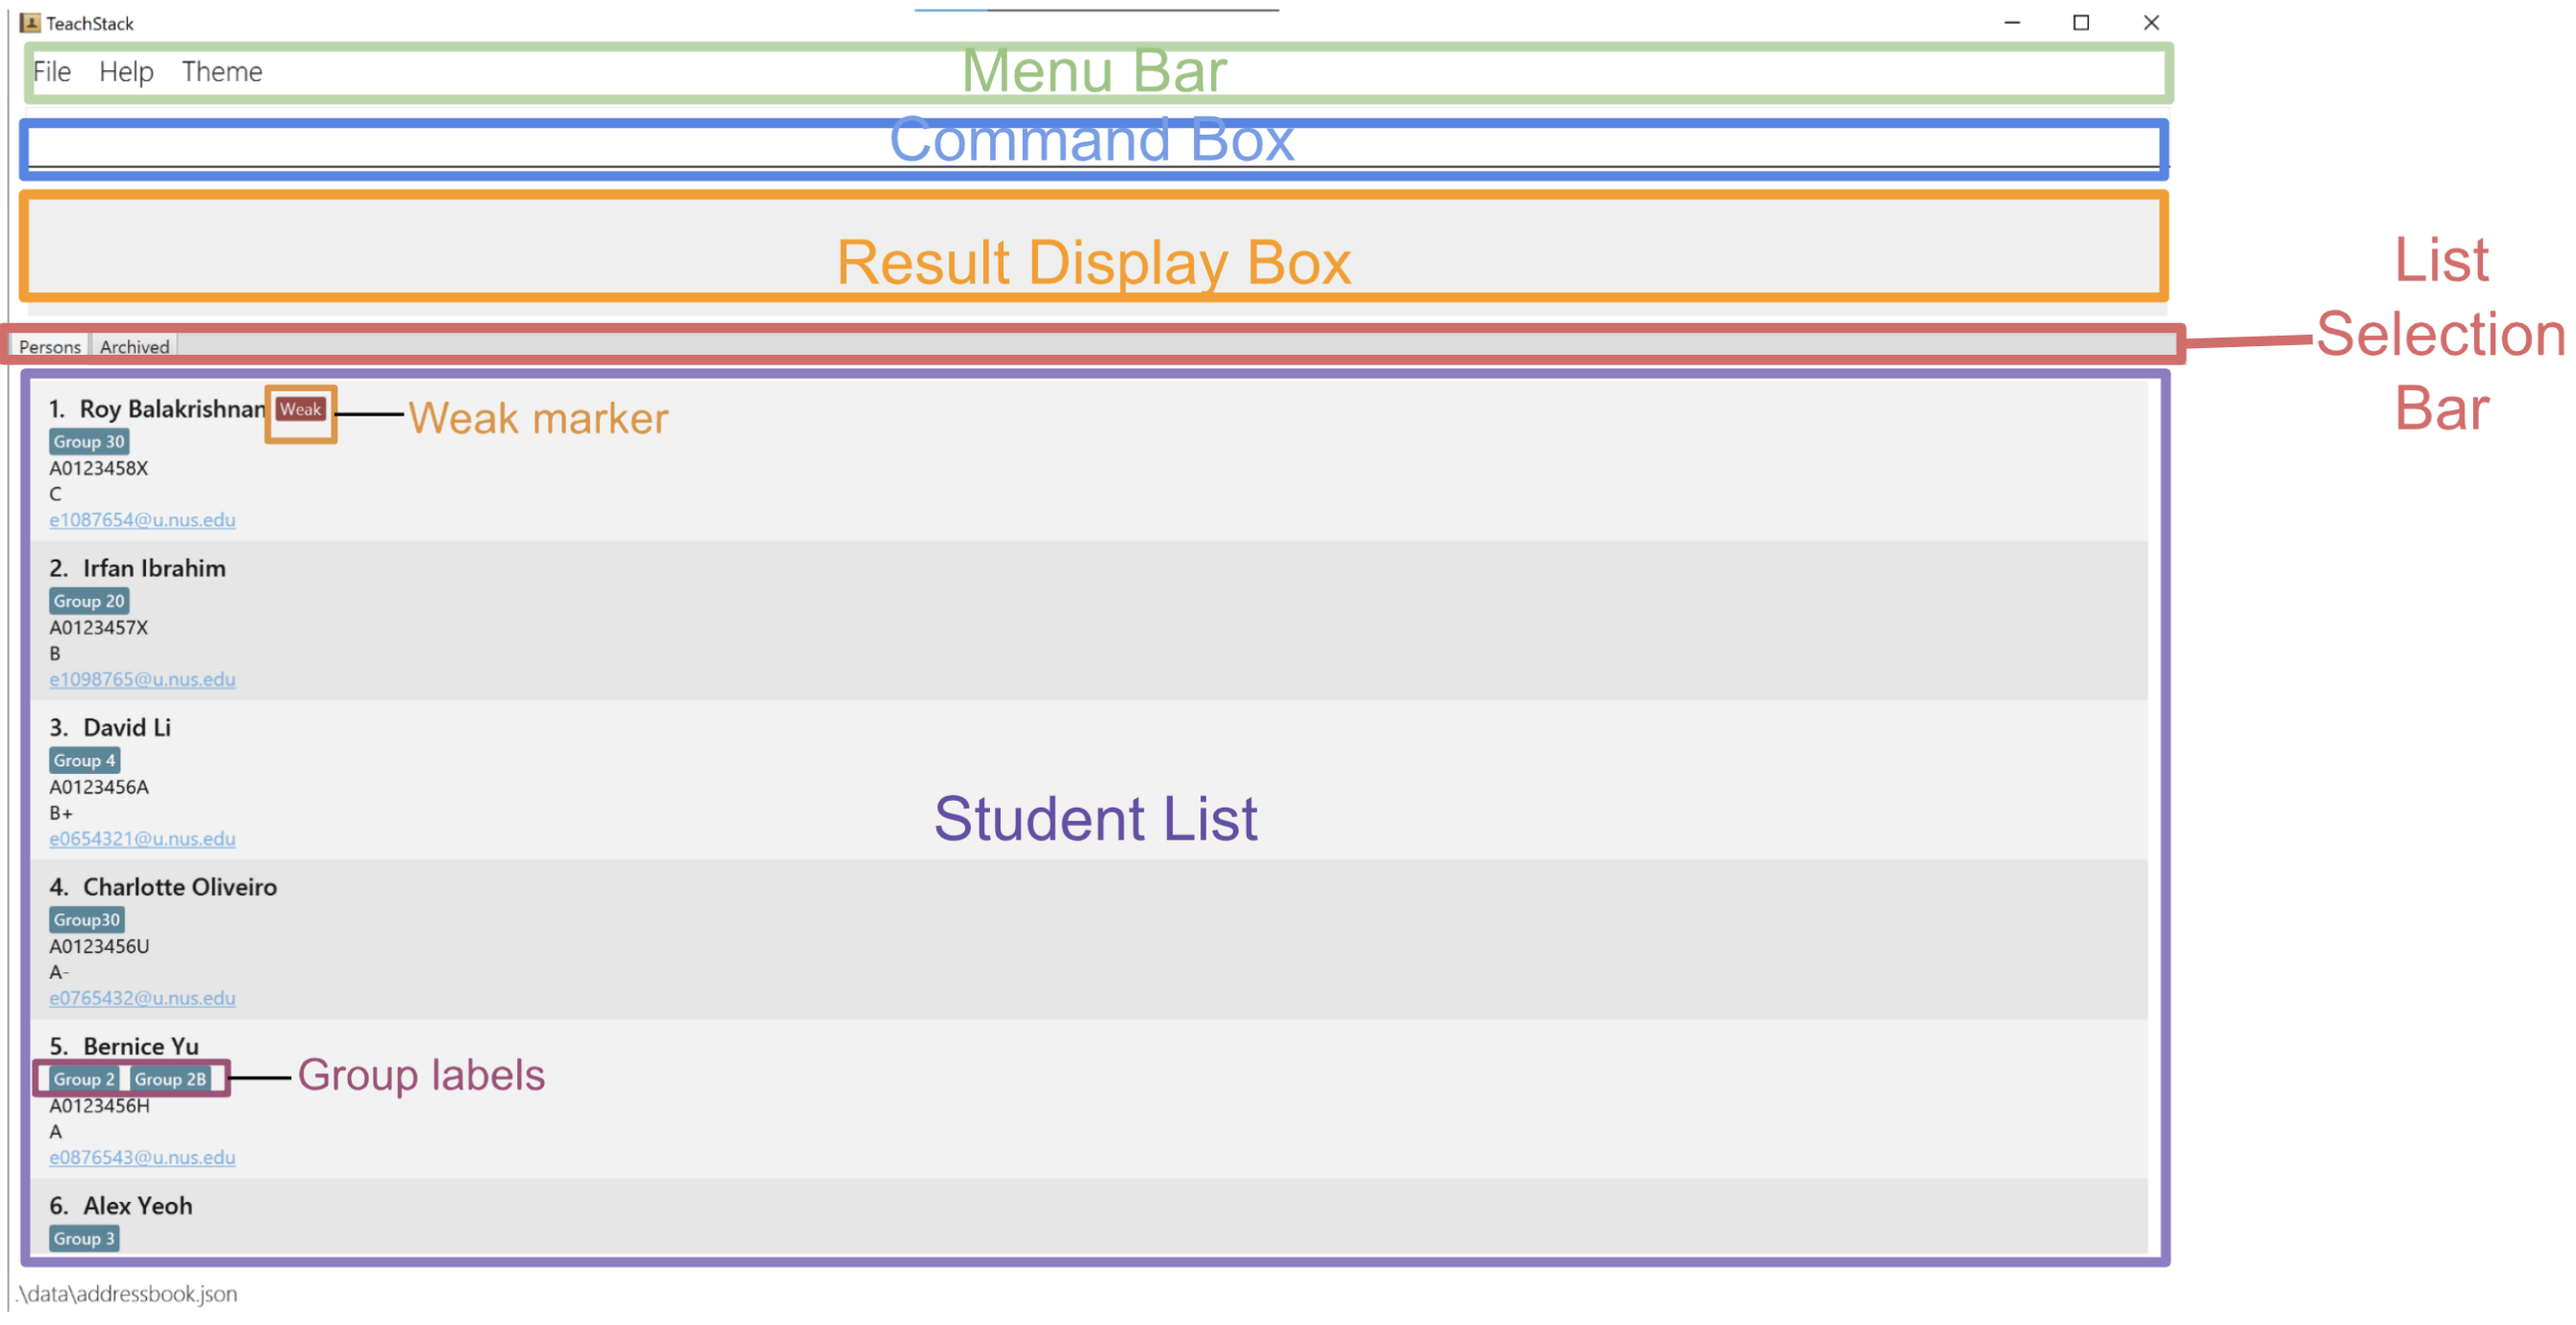
- Menu Bar: Provides a selection of menu items:
- File
- Exit: Allows you to close the application.
- Help
- Help: Shows a message on how to access the help page.
- Theme
- Dark: Switches the application theme to a dark mode for better visibility in dark environments.
- Light: Switches the application theme to a light mode for better visibility in bright environments. Theme is set to light mode by default.
- File
- Command Box: Type in commands to be executed here.
- Result Display Box: Displays commands’ results and any errors.
- List Selection Bar: Provides a selection of student lists to view:
- Persons: Displays active student list.
- Archived: Displays archived student list.
- Student List: Lists students and their details.
- Weak marker: Indicates a weaker student.
- Group labels: Indicates the groups in which a student belongs to.
7. Features
![]() Notes about the command format:
Notes about the command format:
-
Words in
UPPER_CASEare the parameters to be supplied by the user.
e.g. inadd n/NAME,NAMEis a parameter which can be used asadd n/John Doe. -
Items in square brackets are optional.
e.g.n/NAME [gp/GROUP]can be used asn/John Doe gp/Group 1or asn/John Doe. -
Ellipsis after a parameter indicates that the command can take in multiple values for the parameter.
e.g.id/STUDENT_ID…can be used asid/A0123434A id/A0232356Cor asid/A0123434A. -
Parameters can be in any order.
e.g. if the command specifiesn/NAME e/EMAIL,e/EMAIL n/NAMEis also acceptable. -
Extraneous parameters for commands that do not take in parameters (such as
help,list,exit,clear, andclear_archived) will be ignored.
e.g. if the command specifieshelp 123, it will be interpreted ashelp. -
Extraneous parameters for commands that do take in parameters (such as
deleteandgroup) are invalid. This will cause the command to fail.
e.g. commanddelete A0123432A n/Johnorgroup gp/Group 3 id/A0123212A id/A4938274F n/Johnis invalid. -
If you are using a PDF version of this document, be careful when copying and pasting commands that span multiple lines as space characters surrounding line-breaks may be omitted when copied over to the application.
![]() Notes about the parameter format:
Notes about the parameter format:
-
TeachStackonly takes in English input. -
All parameters are case-sensitive.
-
Name must only consist of letters, numbers and space characters. Special characters such as
/,-are not allowed.
eg.John Doeis valid,John-Doeis invalid. -
Student id must start with
A, followed by 7 digits[0-9], and end with any capital letter[A-Z]. It should contain a total of 9 characters.
eg.A0123459Xis valid,a012345678is invalid. -
Email must be in the format
username@domain. Theusernameshould start with e, followed by 7 digits[0-9]. Thedomainshould be u.nus.edu eg.e1234567@u.nus.eduis valid,e1234567@example.comis invalid. -
Grade must be one of [A+, A, A-, B+, B, B-, C+, C, D+, D, F]
eg.A+is valid,C-is invalid. -
Group name must only consist of letters, numbers and space characters.
eg.Focus Group 1is valid,Group !is invalid.
7.1 Viewing help : help
Shows a message explaining how to access the help page.
Don’t worry about saving this user guide, as this link will lead you back here!

Format: help
7.2 Adding a student : add
Adds student details to the persons list. Specifying a group is optional.
Format: add id/STUDENT_ID n/NAME e/EMAIL g/GRADE [gp/GROUP_NAME]...
-
NAME,STUDENT_ID,GRADE, andEMAILmust be specified.GROUP_NAMEis optional. -
NAMEis case-sensitive.- e.g.
John Doeis different fromjohn doe
- e.g.
-
STUDENT_IDshould start with ‘A’, followed by 7 digits, and end with any capital letter.- e.g.
A0123459X
- e.g.
-
EMAILshould be of the formatusername@domain. Theusernameshould start with e, followed by 7 digits. Thedomainshould be u.nus.edu.- e.g.
e0123456@u.nus.edu
- e.g.
-
GRADEshould be one of the valid grades: [A+, A, A-, B+, B, B-, C+, C, D+, D, F]. -
GROUP_NAMEmust only contain alphanumeric characters and space, if you choose to specify a group.
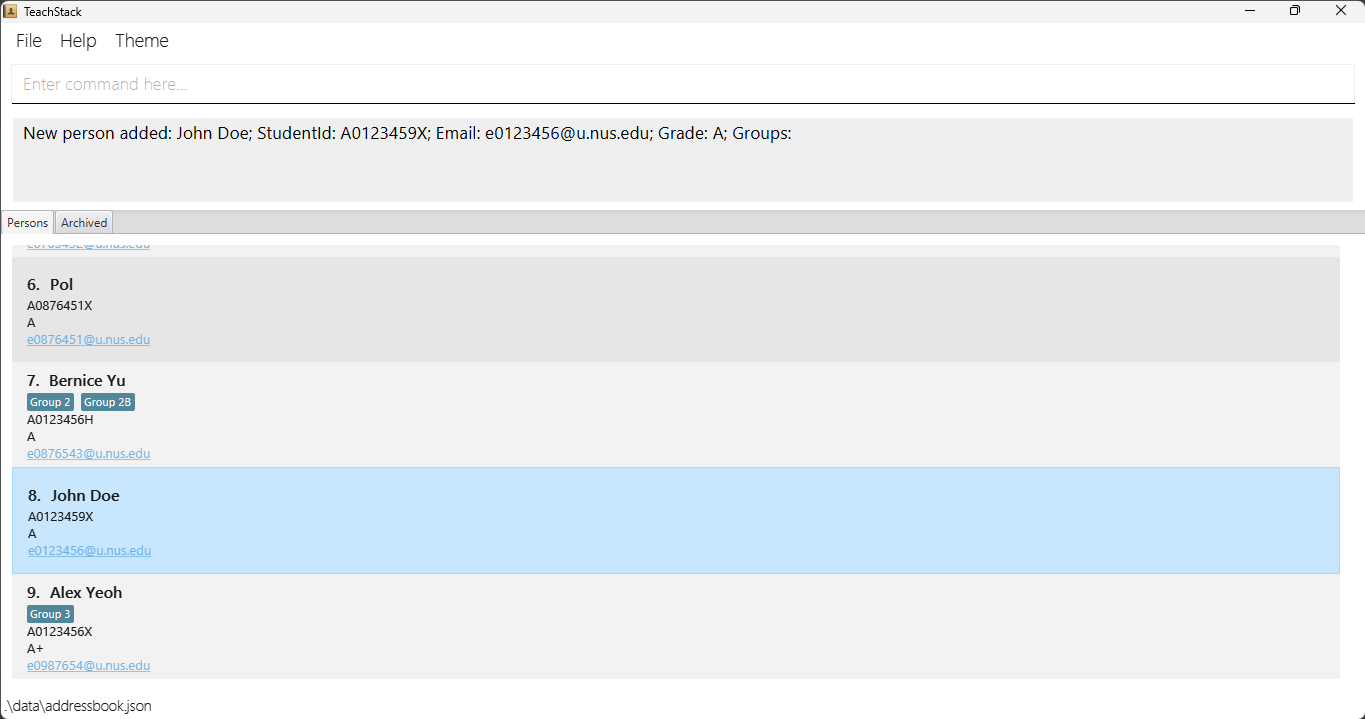
Example:
-
add id/A0123459X n/John Doe e/e0123456@u.nus.edu g/Aadds the student named John Doe withSTUDENT_ID“A0123459X”,EMAIL“e0123456@u.nus.edu” andGRADE“A” to the list.
Expected output:
7.3 Listing all students : list
Shows a list of all students, ordered by grades in descending order, i.e. [F, D, D+, C, C+, B-, B, B+, A- A, A+].
Format: list
- Displays student’s email that is a clickable link to open the user’s mailbox with a new email to the student’s email address.
7.4 Editing a student : edit
Edits an existing student (as specified by STUDENT_ID) in the list of students. Existing fields are updated to match the specified input fields.
Format: edit STUDENT_ID [id/STUDENT_ID] [n/NAME] [e/EMAIL] [g/GRADE] [gp/GROUP_NAME]...
-
STUDENT_IDshould start with ‘A’, followed by 7 digits, and end with any capital letter.- e.g.
A0123459X
- e.g.
-
NAMEis case-sensitive.- e.g.
John Doeis different fromjohn doe
- e.g.
-
EMAILshould be of the formatusername@domain. Theusernameshould start with e, followed by 7 digits. Thedomainshould be u.nus.edu.- e.g.
e0123456@u.nus.edu
- e.g.
-
GRADEshould be one of the valid grades: [A+, A, A-, B+, B, B-, C+, C, D+, D, F]. - The student with the specified
STUDENT_IDmust exist in the list. - Editing
GROUPwill overwrite existingGROUPentries. - Use of
GROUPprefixgp/in an edit command without specifyingGROUP_NAMEwill clear all existingGROUPof the student. - This command will not apply to a student who is archived. In order to edit an archived student, look at the
edit_archivedcommand.
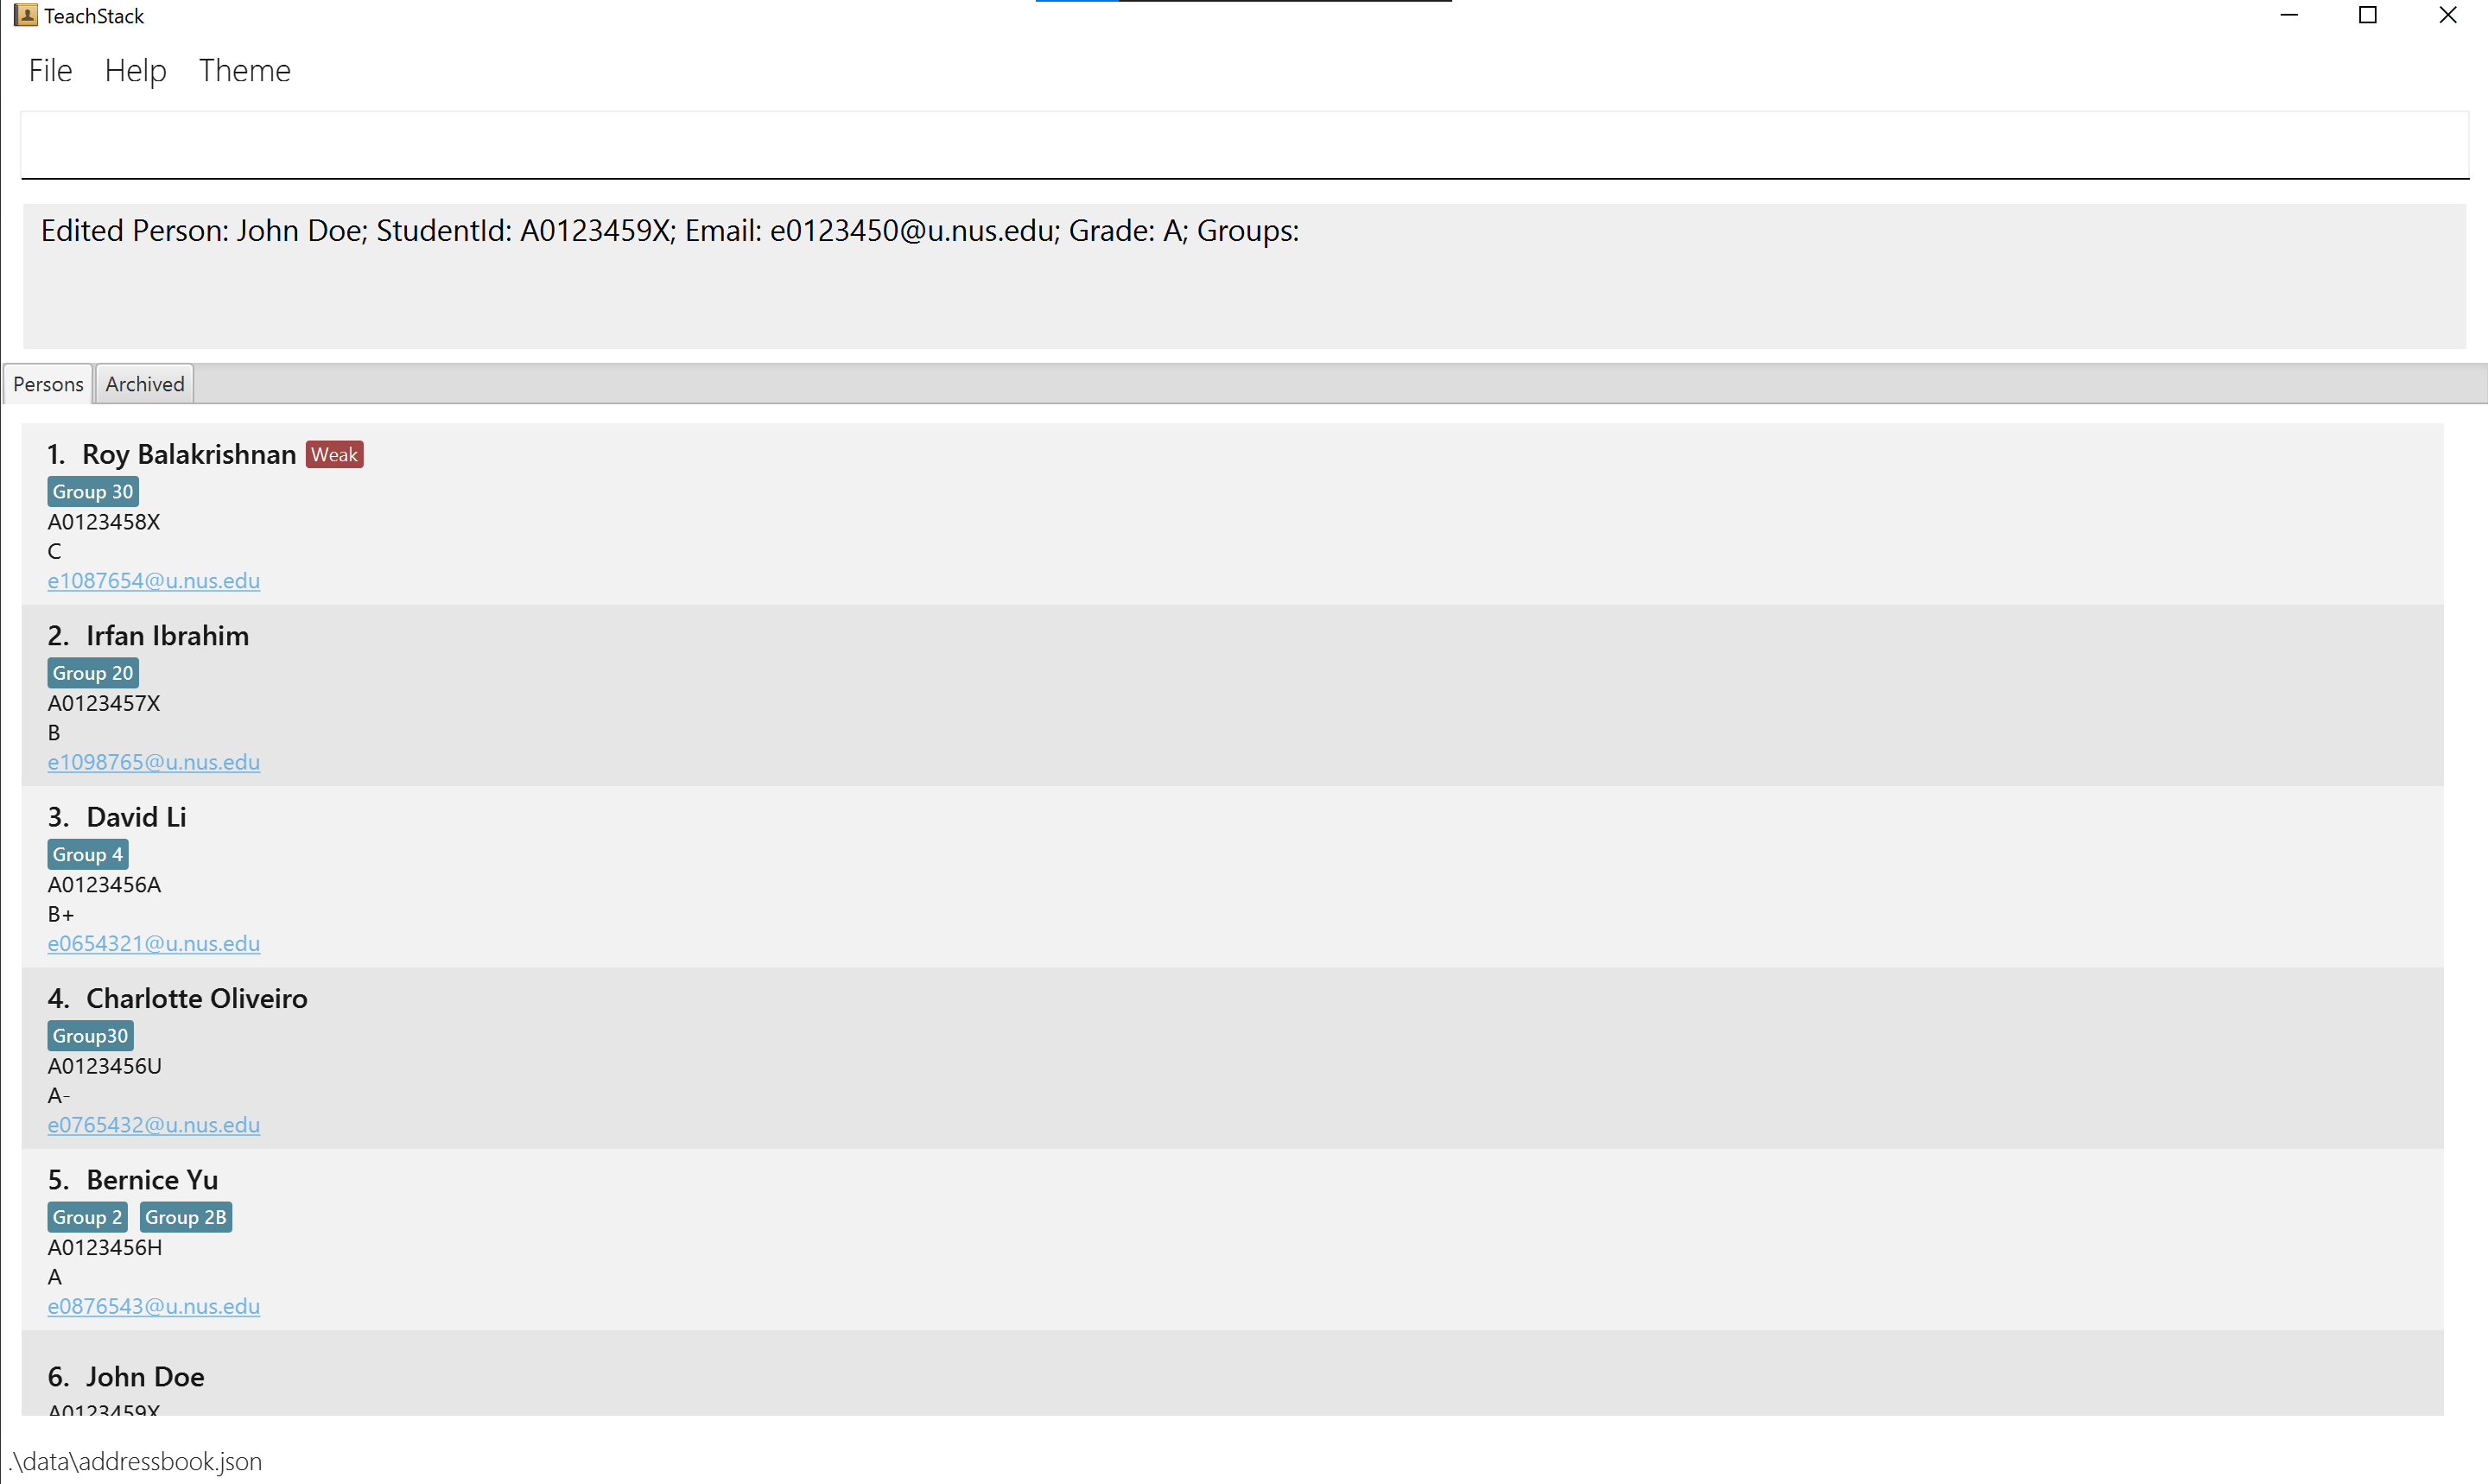
Examples:
-
edit A0123459X e/e0123450@u.nus.eduEdits the email address of the student withSTUDENT_ID = A0123459Xto bee0123450@u.nus.edu. -
edit A0123459X n/John DoeEdits the name of the student withSTUDENT_ID = A0123459Xto beJohn Doe.
Expected output:
7.5 Viewing students : view
Shows the detailed information of the student with the specified STUDENT_ID.
Format: view STUDENT_ID
- Returns the detailed information of the student with the corresponding
STUDENT_ID. - The
STUDENT_IDis case-sensitive. -
STUDENT_IDshould start with ‘A’, followed by 7 digits, and end with any capital letter.- e.g.
A0123459X
- e.g.
- This feature is not applicable to the archived list, i.e. you can only view current students.
Examples:
-
view A0123459XShows the detailed information of the student withSTUDENT_ID = A0123459X
7.6 Deleting a student : delete
Deletes the specified student from the list.
Format: delete STUDENT_ID
- Deletes the student with the specified
STUDENT_ID. - The
STUDENT_IDrefers to the id corresponding to the student in the list. -
STUDENT_IDshould start with ‘A’, followed by 7 digits, and end with any capital letter.- e.g.
A0123459X
- e.g.
- The student with the specified
STUDENT_IDmust exist in the list. - This command will not apply to a student who is archived. In order to delete an archived student, look at the
delete_archivedcommand.
Examples:
-
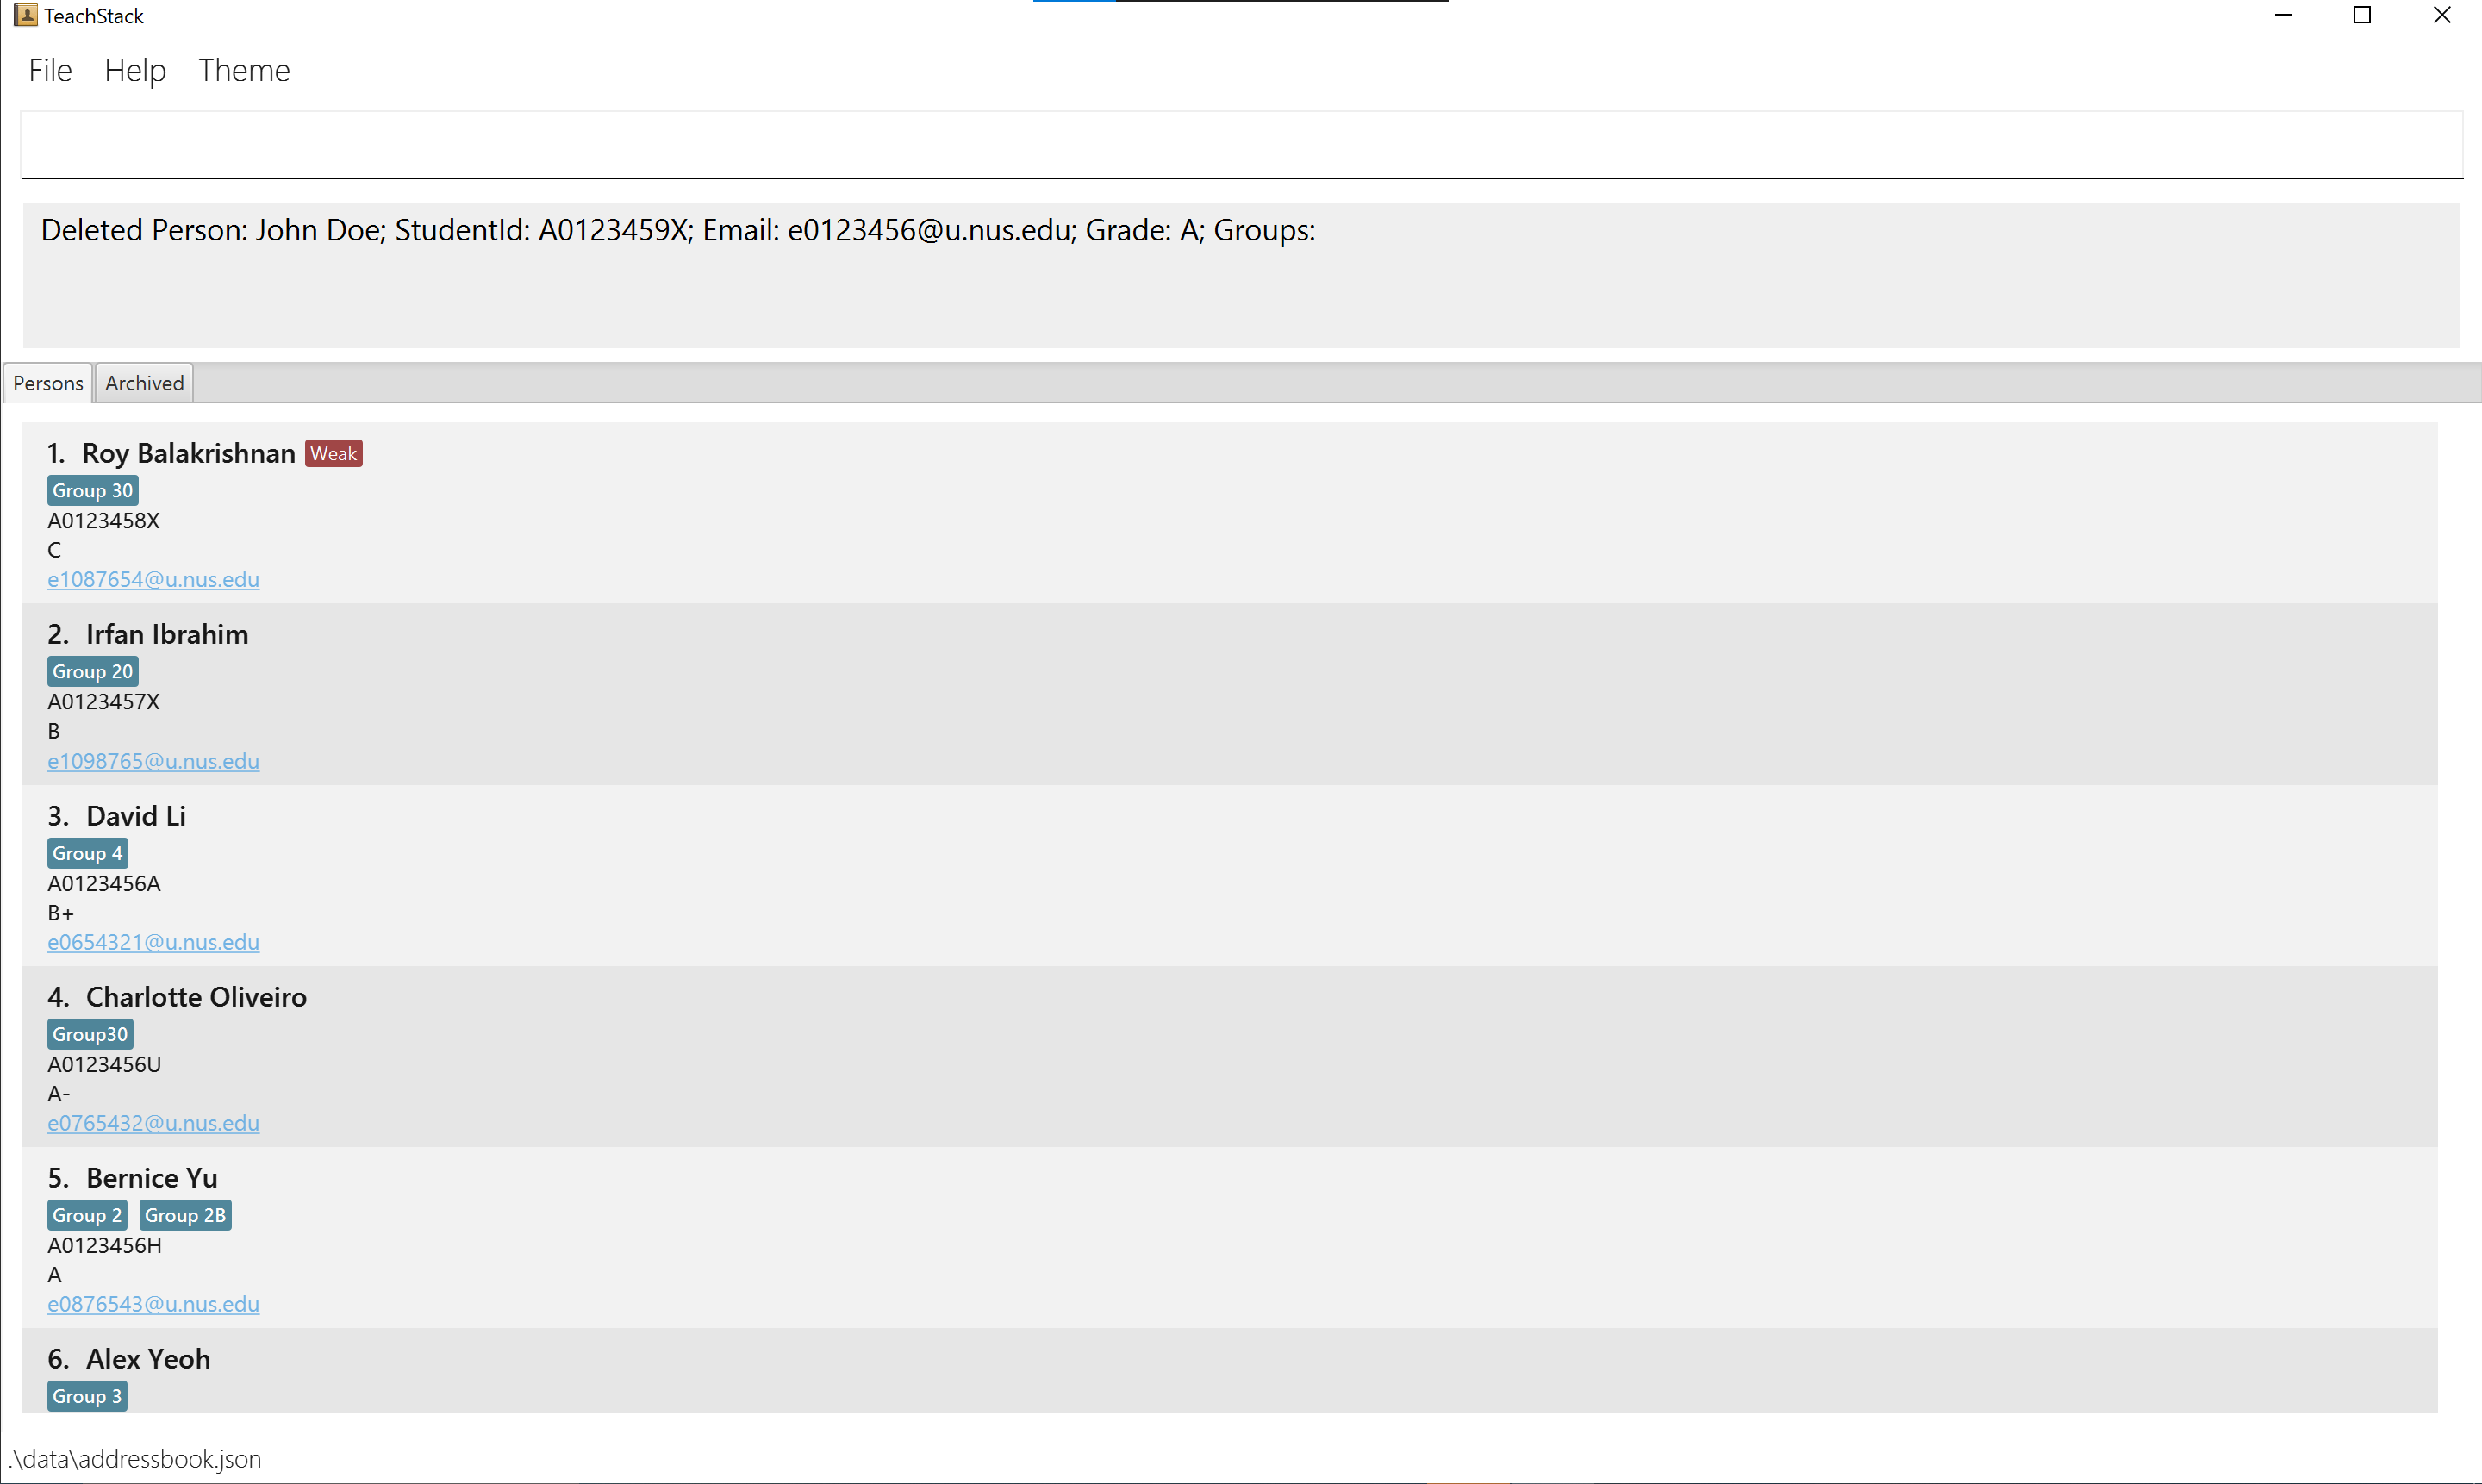
delete A0123459Xdeletes the student withSTUDENT_ID = A0123459Xfrom the list.
Expected output:
7.7 Forming focus groups
7.7.1 Forming focus groups manually : group
Creates a group with students corresponding to the selected IDs.
Format: group gp/GROUP_NAME… id/STUDENT_ID…
- The group name includes students with the corresponding
STUDENT_IDs. - If any of the given
STUDENT_IDsdo not exist, the command completely fails. -
GROUP_NAMEcannot be empty, and must only contain alphanumeric characters and space. - Giving no parameter for
GROUP_NAMEwill clear the given students’ current groups!
Examples:
-
group gp/3 id/A0123456X id/A0123456Hforms a group called3with 2 students in it. -
group id/A0123456X id/A0123456Hremoves the corresponding 2 students from any groups they are currently in.
7.7.2 Forming random groups : random
Puts all students marked as weak into the specified number of groups.
Format: random NUMBER_OF_GROUPS gp/GROUP_NAME
- Form groups
NUMBER_OF_GROUPSwith the specifiedGROUP_NAMEfollowed by numbering. - The
NUMBER_OF_GROUPSrefers to the number of groups to distribute students into. -
NUMBER_OF_GROUPSmust be a positive integer that is smaller than the number of students marked as weak. -
GROUP_NAMEcannot be empty, and must only contain alphanumeric characters and space.
Examples:
-
random 3 gp/Random Grouprandomly distributes all weaker students into 3 groups: Random Group 1, Random Group 2, Random Group 3.
![]() Notes about groups formed:
Notes about groups formed:
- Group formed cannot be deleted individually unless using the
groupcommand to clear all groups
eg.group id/A0123459Xremoves student withSTUDENT_ID = A0123459Xfrom all the groups the student was in. - Random groups formed will not be affected by the
setweakcommand
i.e. student in a randomly formed group will remain in the group aftersetweakcommand, even if the student falls above the new weak threshold
7.8 Filtering students by groups : find
Updates the list to display only students that are in the group(s) specified.
Format: find gp/GROUP_NAME…
- At least one
GROUP_NAMEmust be specified. Otherwise, the command will fail. - If multiple
GROUP_NAMEs are specified, only students who are in all groups entered will be displayed. -
GROUP_NAMEcannot be empty, and must only contain alphanumeric characters and space. - Only the
personslist will be updated,archivedlist will not be updated. - Result displayed refers to the number of students found in the
personslist.
Examples:
-
find gp/Group 1will update the list to display all students assigned to Group 1. -
find gp/Group 1 gp/Group 2will update the list to display all students assigned to both Group 1 and Group 2.
7.9 Clearing all entries : clear
Clears all entries from the list of students.
Format: clear
7.10 Archiving Features
7.10.1 Archiving a student : archive
Archives a student from the persons list. That student is moved to the archived list.
Format: archive STUDENT_ID
- Archives a student with the specified
STUDENT_ID. -
STUDENT_IDshould start with ‘A’, followed by 7 digits, and end with any capital letter.- e.g.
A0123459X
- e.g.
- The student with the specified
STUDENT_IDmust exist in thepersonslist.
Example:
-
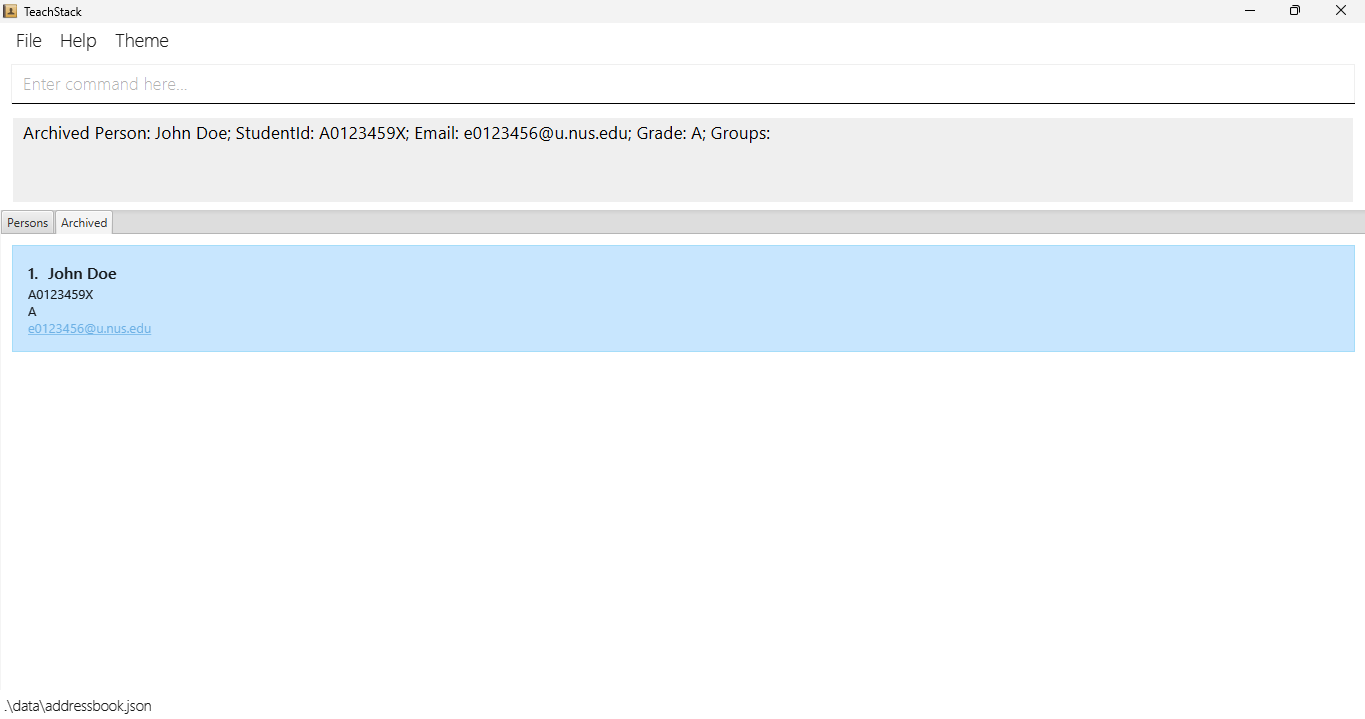
archive A0123459Xarchives a student withstudent_id = A0123459X.
Expected output:
7.10.2 Editing an archived student : edit_archived
Edits details of an archived student.
Format: edit_archived STUDENT_ID [id/STUDENT_ID] [n/NAME] [e/EMAIL] [g/GRADE] [gp/GROUP_NAME]...
- Edits the details of an archived student with the specified
STUDENT_ID. - At least one of the optional fields indicated within the square bracket must be provided.
- The
...after theGROUP_NAMEindicates that multipleGROUP_NAMEs can be provided for editing. - The student with the specified
STUDENT_IDmust exist in the archived list. -
STUDENT_IDshould start with ‘A’, followed by 7 digits, and end with any capital letter.- e.g.
A0123459X
- e.g.
-
EMAILshould be of the formatusername@domain. Theusernameshould start with e, followed by 7 digits. Thedomainshould be u.nus.edu.- e.g.
e0123456@u.nus.edu
- e.g.
-
NAMEis case-sensitive.- e.g.
John Doeis different fromjohn doe
- e.g.
-
GRADEshould be one of the valid grades: [A+, A, A-, B+, B, B-, C+, C, D+, D, F]. - Editing
GROUPwill overwrite existingGROUPentries. - Use of
GROUPprefixgp/in an edit command without specifyingGROUP_NAMEwill clear all existingGROUPs of the student! - This feature is only applicable to the archived list.
Examples:
-
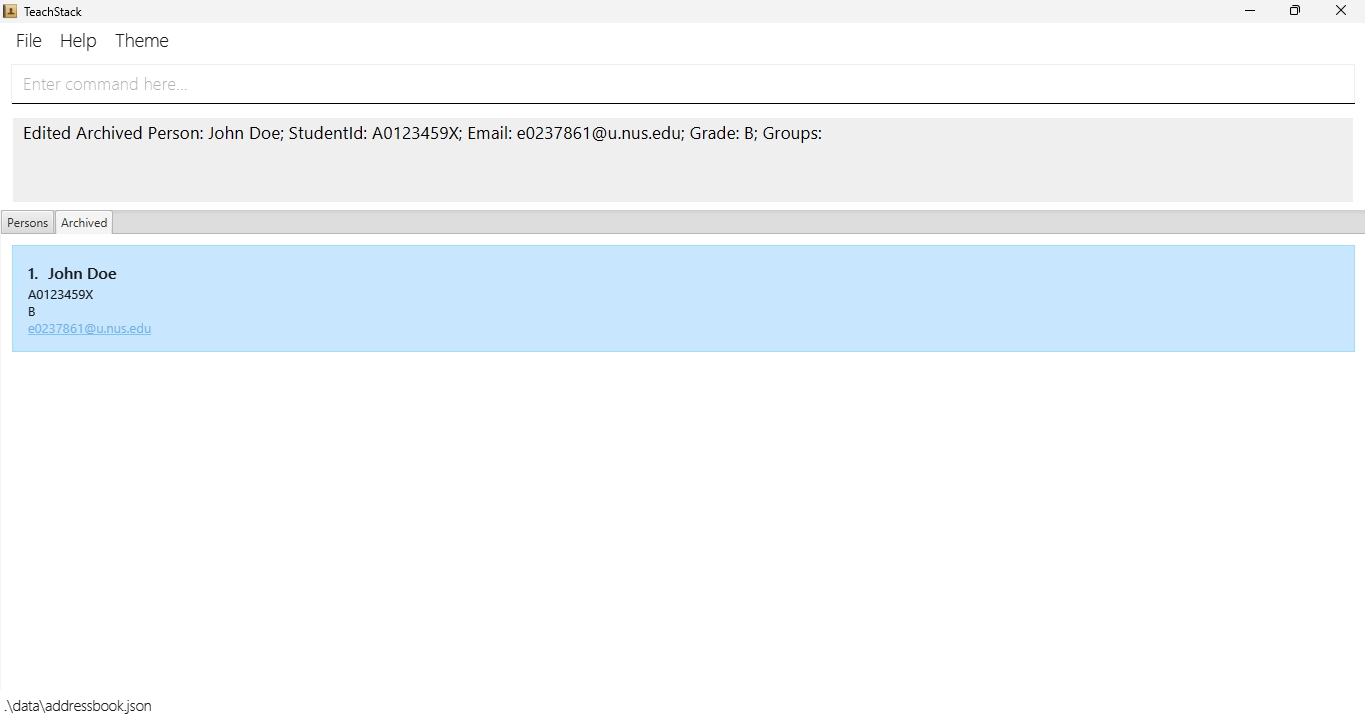
edit_archived A0123459X g/B e/e0237861@u.nus.eduedits the grade of the student withSTUDENT_ID = A0123459Xto “B” and theEMAILto “e0237861@u.nus.edu”.
Expected output:
7.10.3 Deleting an archived student : delete_archived
Deletes an archived student from the archived list.
Format: delete_archived STUDENT_ID
- Deletes an archived student with the specified
STUDENT_ID. -
STUDENT_IDshould start with ‘A’, followed by 7 digits, and end with any capital letter.- e.g.
A0123459X
- e.g.
- The student with the specified
STUDENT_IDmust exist in the archived list. - This feature is only applicable to the archived list.
Example:
-
delete_archived A0123459Xdeletes the student withSTUDENT_ID = A0123459Xfrom the archived list.
Expected output:

7.10.4 Unarchiving a student : unarchived
Unarchives a student from the archived list. That student is moved to the persons list.
Format: unarchived STUDENT_ID
- Unarchives a student with the specified
STUDENT_ID. -
STUDENT_IDshould start with ‘A’, followed by 7 digits, and end with any capital letter.- e.g.
A0123459X
- e.g.
- The student with the specified
STUDENT_IDmust exist in the archived list. - This feature is only applicable to the archived list.
Examples:
-
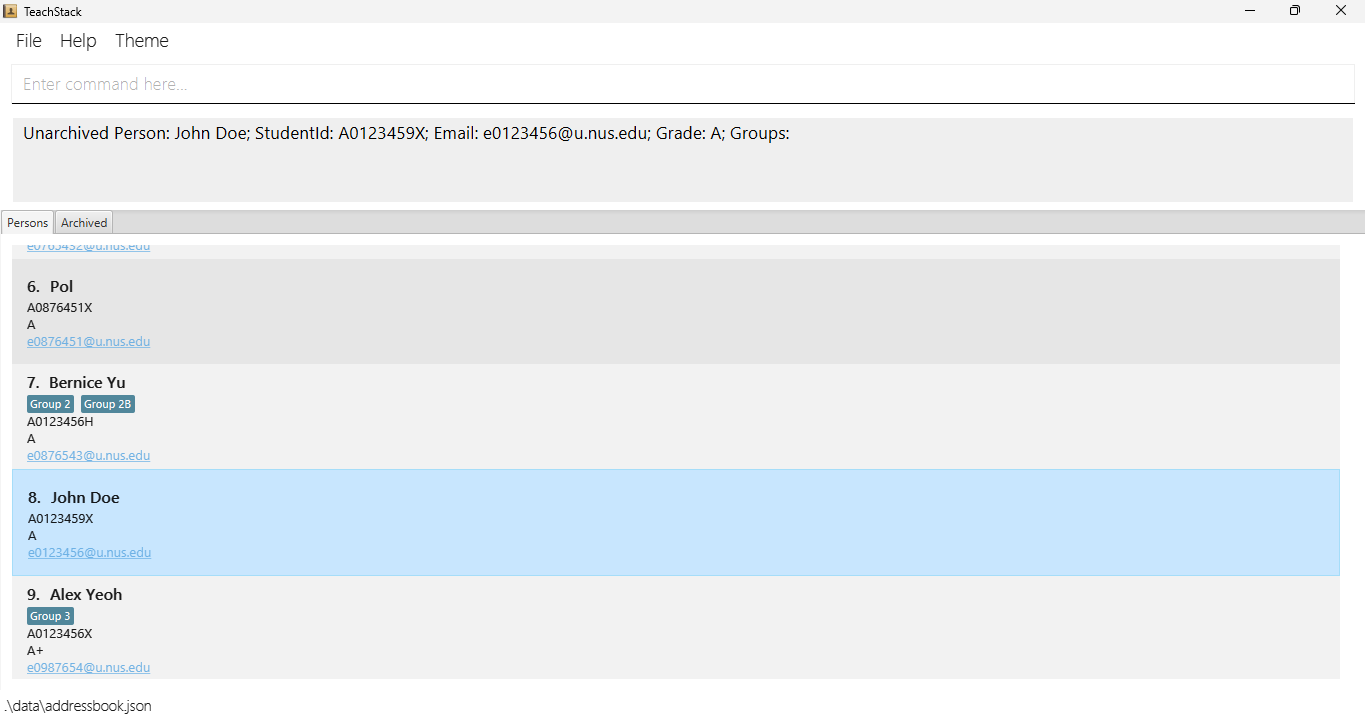
unarchived A0123459Xunarchives a student with thestudent_id = A0123459X.
Expected output:
7.10.5 Clearing all entries : clear_archived
Clears all entries from the archived list.
- This feature is only applicable to the archived list.
Format: clear_archived
7.11 Exiting the program : exit
Exits the program.
Format: exit
7.12 Saving the data
TeachStack data is saved in the hard disk automatically after any command that changes the data. There is no need to save manually.
7.13 Editing the data files
TeachStack data is saved automatically as a JSON file [JAR file location]/data/addressbook.json and [JAR file location]/data/userdata.json. Advanced users are welcome to update data directly by editing that data file.
Furthermore, certain edits can cause the TeachStack to behave in unexpected ways (e.g., if a value entered is outside of the acceptable range). Therefore, edit the data file only if you are confident that you can update it correctly. Teachstack cannot take any responsibility for corrupted data if you choose to modify the data files directly.
7.14 Setting weak threshold : setweak
Sets the weakness threshold for a weak marker. The weakness threshold is the minimum grade for a student to be considered weak.
Format: setweak g/GRADE
- By default, weakness threshold is set at Grade:
C+ - The command updates the weakness threshold value.
- Students with grade lower than or equal to the threshold grade appear with a marker in the UI. Look at the below image to see an example.
-
GRADEshould be one of the valid grades: [A+, A, A-, B+, B, B-, C+, C, D+, D, F]. - After setting the threshold with the command, the weak marker will be maintained even after shutting down the application.
- Do note that the
setweakcommand does not affect archived students. This means weak labels on archived students will not be changed.
Example:
-
setweak g/Bdisplays a weak marker for all students with grade B or lower.
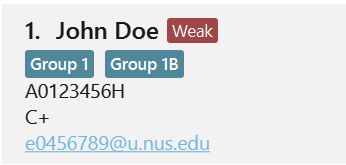
Before command (Default Weakness Threshold)
After command setweak B
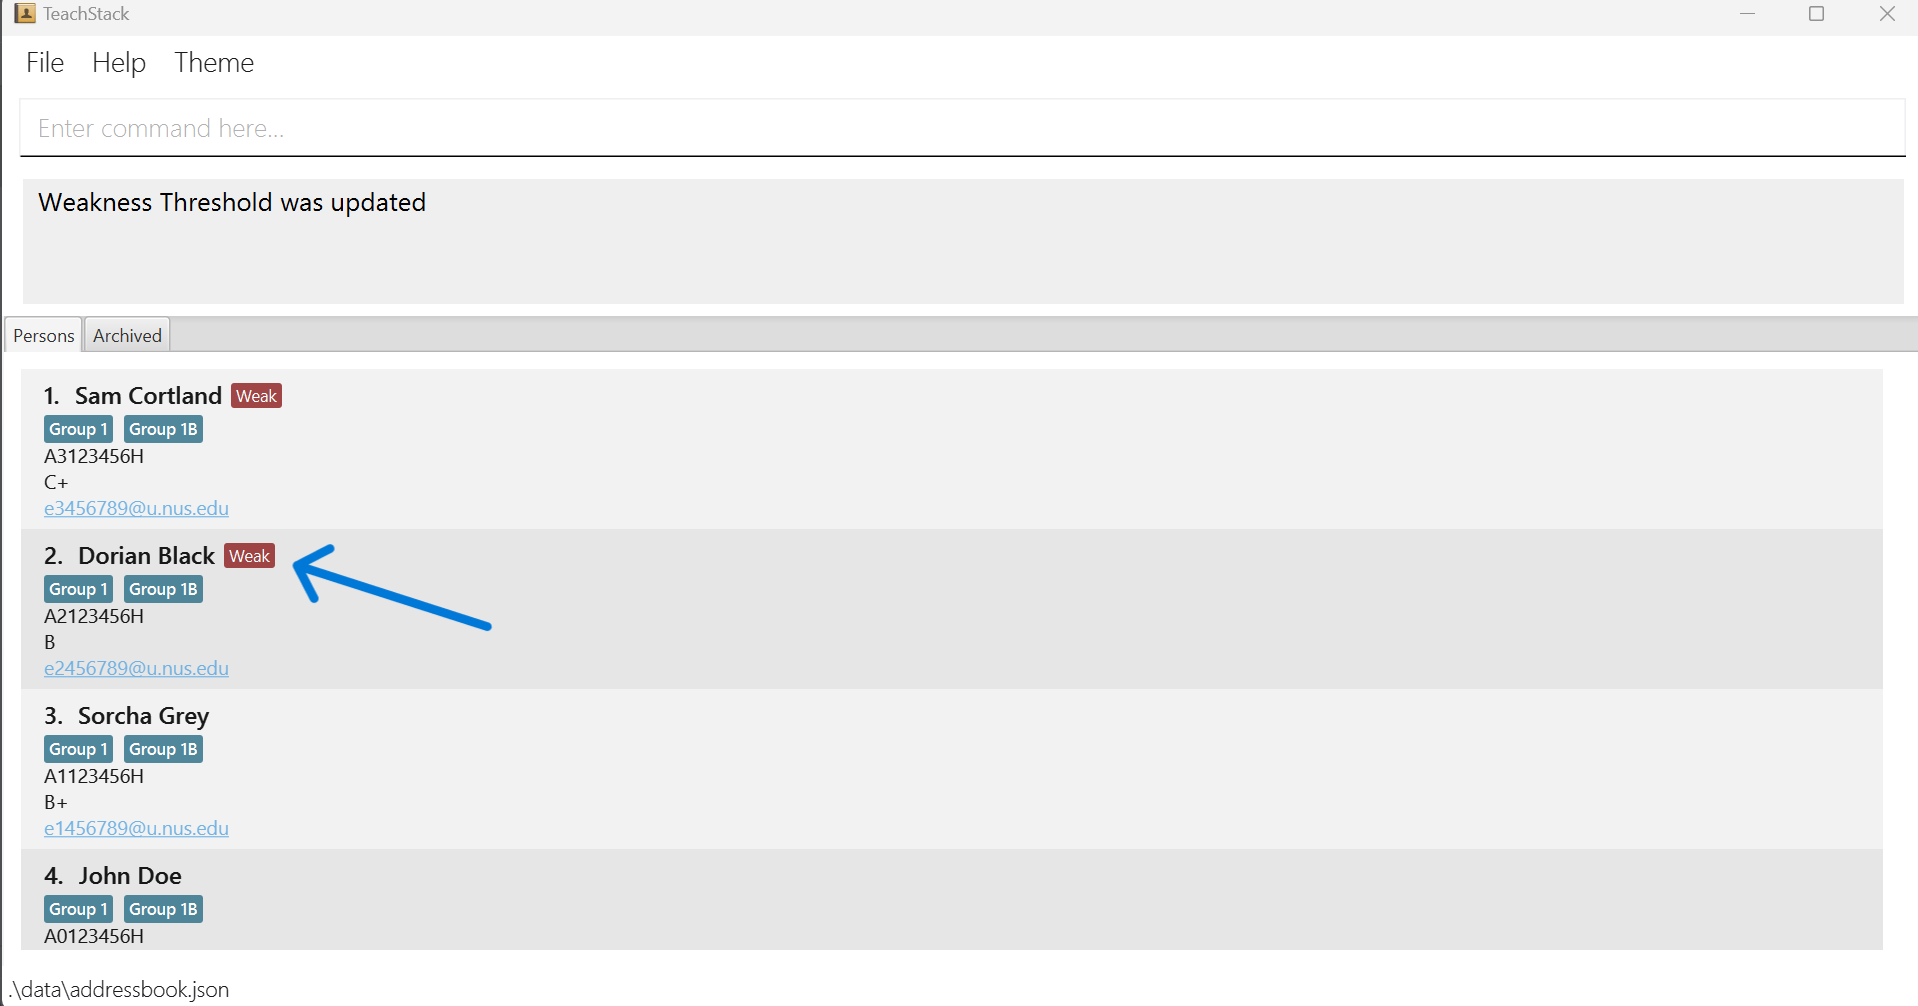
Dorian Grey now has a weak marker which was not there previously, as we just changed the weak threshold to B.
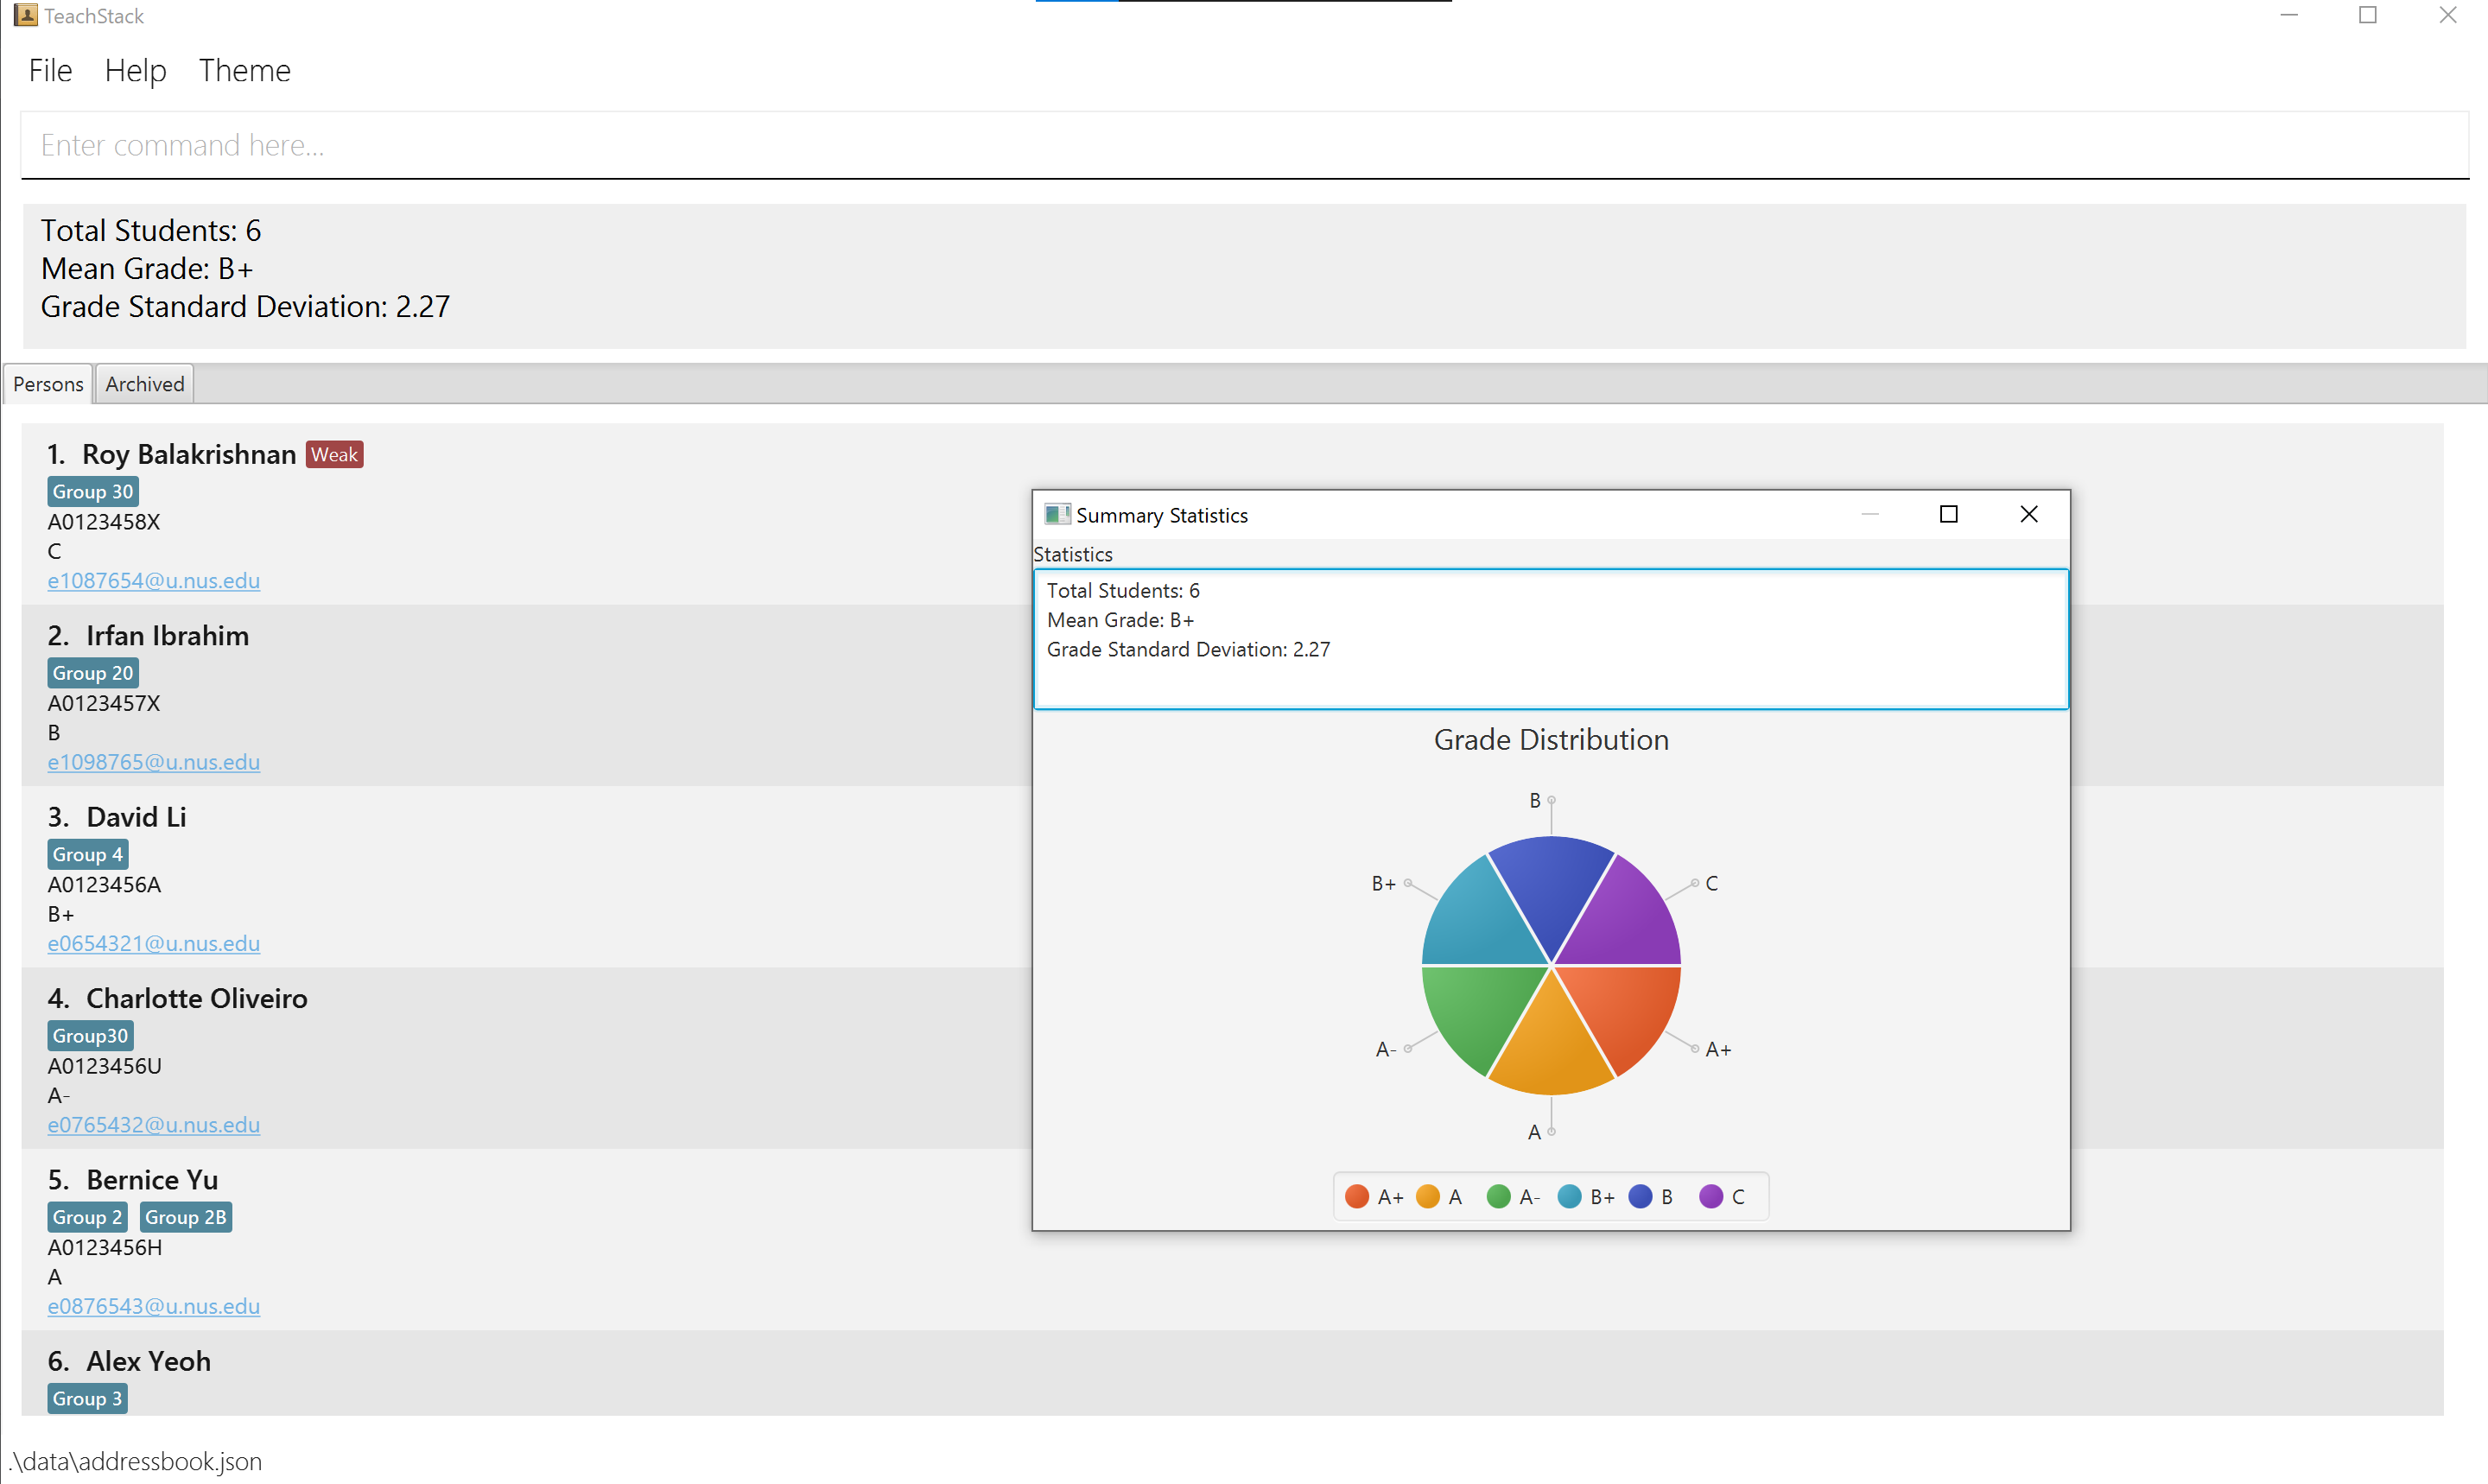
7.15 Viewing summary statistics : summary
Displays a summary of all students.
Format: summary
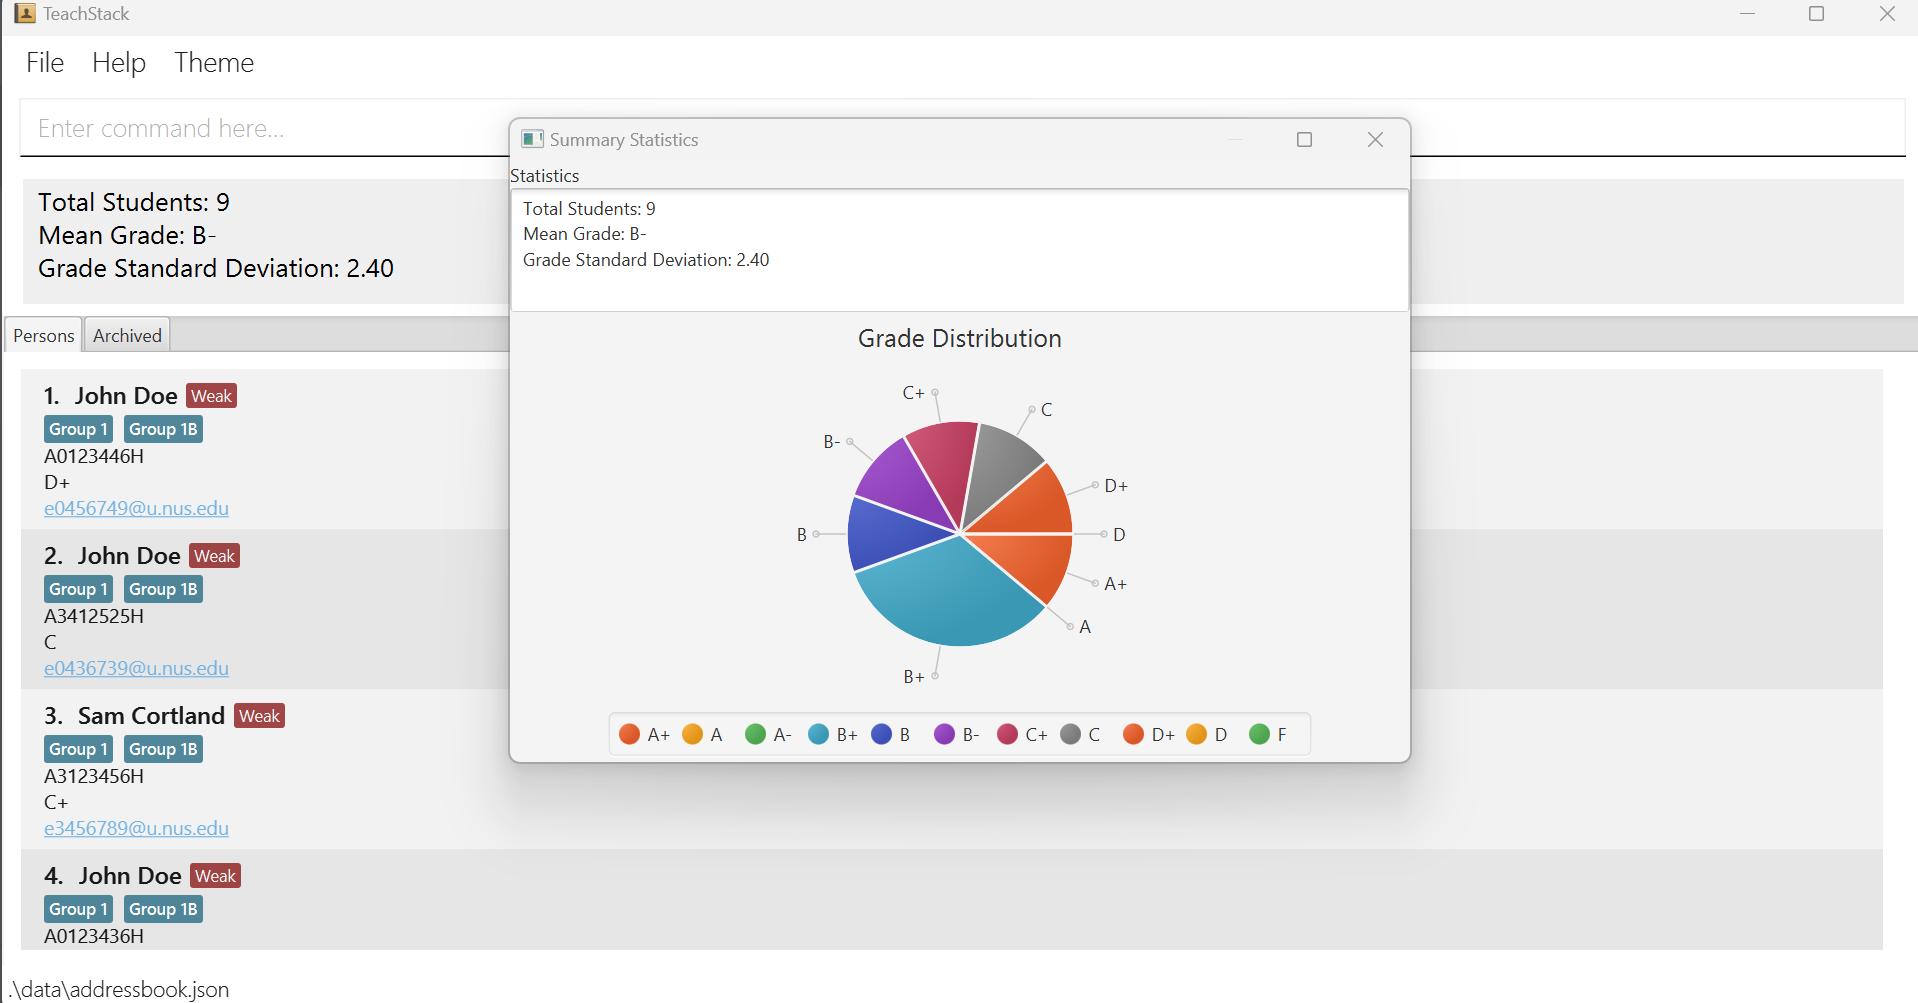
- Entering the command opens a popup window.
- The new window contains statistics: Total Students, Average Grade, and Standard Deviation of Grades.
- It also contains a pie chart of students’ grades.
- If there are 0 students, the pie chart does not display.
- Do note that the
summarycommand does not consider archived students.
Displayed after the command: summary
8. Glossary
- GUI: Graphical User Interface. An interface that uses visual representations, such as icons, buttons and windows where users can use to interact with the system.
-
CLI: Command Line Interface. A text-based interface that allows users to interact with the application by typing commands. Command is parsed to the system when users hit
Enter. -
JAR: Java Archive. Package file format used to aggregate the Java class files and associated metadata and resources required to run
TeachStackinto one file to distribute the application. - Student: Student studying at NUS and instructed by the user.
-
Student ID: Unique matriculation number of an NUS student.
TeachStackonly accepts a student id that starts with ‘A’, followed by 7 consecutive digits and ends with a capital letter ‘[A-Z]’. -
Email: An electronic mail address.
TeachSTackonly accepts NUS email addresses in the format ‘eXXXXXXX@u.nus.edu’ where ‘X’ can be any digit. -
Grade: A letter that shows how good a student’s performance is.
TeachStackonly accepts grades that exist in the NUS grading system ([A+, A, A-, B+, B, B-, C+, C, D+, D, F]). -
Name: Name of a student.
TeachStackonly accepts name consisting of alphabets, numbers and space. -
Focus group: Group of students such that the user can pay more attention to assist the students in the group. Indicated by a
Group labelon the GUI -
Student details: The student’s
NAME,STUDENT_ID,EMAIL,GRADE, and focus group (GROUP) that the student belongs to, if any. -
Grade threshold: A threshold used by the system to determine if a student is considered as
weakbased on their grades. If the student’s grade falls below, or is at the threshold, the student is considered as weak. It is set to C+ by default. The user can update the threshold using thesetweakcommand according to their preference. - Summary statistics: Statistics of all active students (not in archived list), including the total number of students, mean grade, standard deviation of grade and a pie chart showing grade distribution.
9. FAQ
9.1 General concerns
Q: Is TeachStack free to use?
A: Yes! TeachStack is completely free to use. We believe in making student management accessible to all computer science instructors. Enjoy the full functionality of TeachStack without any subscription fees or hidden charges.
Q: I am facing issues/want to give suggestions for TeachStack. How can I resolve them?
A: Not to worry! Our developer team is committed to ensuring the best experience for instructors like you. Please submit any issues/suggestions you might have to our Google form here. Alternatively, you can also file them on our Github repository here. We appreciate your feedback and will respond as soon as possible.
Q: Is TeachStack suitable for use for computer science instructors outside of NUS?
A: For now, the application is only meant to be used within NUS. However, we do plan to make improvements to allow all computer science instructors, regardless of educational institution, to utilise the application, so do keep an eye out for future developments!
Q: Is TeachStack suitable for Teaching Assistants (TAs)?
A: While TeachStack is currently tailored for computer science instructors to simplify managing large student bodies, TAs may also find our app useful, especially in scenarios with larger class sizes. We continually strive to expand TeachStack’s capabilities to better serve the diverse needs of educators and teaching teams.
Q: Is TeachStack really better than Canvas, Excel, etc. for me?
A: Yes! While the other platforms do offer valuable features, TeachStack stands out with its CLI, intuitive group forming, archiving, and other tailored features designed specifically for computer science educators. What sets TeachStack apart is our commitment to continuous improvement and development, driven by your feedback. With ongoing enhancements, we’re dedicated to ensuring TeachStack remains the preferred choice for instructors seeking to elevate their teaching experience.
9.2 Using TeachStack
Q: How do I transfer my data to another computer?
A: Install the app in the other computer and overwrite the empty data file it creates with the file that contains the data of your previous TeachStack home folder.
Q: I made changes to the data files manually, and I am now facing errors! What should I do?
A: We recommend that you only manually edit the files if you are confident that you can update it correctly. In the event that you run into errors after manually editing the files, please delete the [JAR file location]/data folder so TeachStack can create new files.
Q: Do I have to save my changes manually?
A: No, TeachStack will automatically save any changes you have made after a command is entered.
10. Known issues
-
When using multiple screens, if you move the application to a secondary screen, and later switch to using only the primary screen, the GUI will open off-screen. The remedy is to delete the
preferences.jsonfile created by the application before running the application again.
11. Command summary
| Action | Format, Examples |
|---|---|
| Add |
add id/STUDENT_ID n/NAME e/EMAIL g/GRADE [gp/GROUP_NAME]... e.g., add id/A0123459X n/James Doe e/e0123456@u.nus.edu g/A
|
| Delete |
delete STUDENT_IDe.g., delete A0123456X
|
| Edit |
edit STUDENT_ID [id/STUDENT_ID] [n/NAME] [e/EMAIL] [g/GRADE] [gp/GROUP_NAME]... e.g., edit A0123466C g/A+
|
| View |
view STUDENT_IDe.g., view A0123466D
|
| Group |
group gp/GROUP_NAME id/STUDENT_ID_1 [id/STUDENT_ID_2] ... e.g., group gp/Group 1 id/A1234567R, id/A2345678R
|
| Random Group |
random NUMBER_OF_GROUPS gp/GROUP_NAME e.g., random 3 gp/Random Group
|
| Weak |
setweak g/GRADE e.g., setweak g/B
|
| Filter Group |
find gp/GROUP_NAME ... e.g., find gp/Group 1
|
| Summary | e.g., summary |
| Archive |
archive STUDENT_ID e.g., archive A0123459X
|
| Unarchive |
unarchived STUDENT_ID e.g., unarchived A0123459X
|
| EditArchive |
edit_archived STUDENT_ID [id/STUDENT_ID] [n/NAME] [e/EMAIL] [g/GRADE] [gp/GROUP_NAME]... e.g., edit_archived A0123459X g/B
|
| DeleteArchive |
delete_archived STUDENT_ID e.g., delete_archived A0123459X
|
| ClearArchive | clear_archived |
| Help | help |
| Clear | clear |
| Exit | exit |